
Table of Contents
In the world of project management, every second counts. Jira, Atlassian‘s flagship project management tool, offers a suite of automation rules designed to streamline your workflow and shave hours off your weekly task management.
Let’s dive into the top Jira Automation Rules that will not only save you an hour every day but also transform the way you tackle your project list.
Auto-Assign Issues:
When a new issue is created, time is of the essence. Set up an automation rule to assign new issues to the appropriate team member based on the issue type, project, or label. This ensures issues are immediately in the right hands, cutting down on sorting time and preventing tasks from falling through the cracks.
Step 1: Access Project Settings
- Navigate to your Jira project.
- Click on ‘Project settings’ at the bottom-left of the sidebar.
Step 2: Locate Automation Rules
- Within the Project settings, find and click on ‘Automation’ (this might be under ‘Apps’ if using Jira Cloud).
Step 3: Create a New Rule
- Click on ‘Create rule’ at the top-right corner.
- You’ll be presented with a variety of triggers. Select ‘Issue created’ to start your rule when a new issue is added to the project.
Step 4: Set Conditions
- Now, add a ‘New condition’ to specify which issues should be auto-assigned. This can be based on issue type, priority, or labels. For example, you can select ‘Issue fields condition’ to match issues with specific fields.
- Use JQL for advanced conditions like
project = "YourProjectName" AND issuetype = Bug.
Step 5: Choose the Assignment Method
- After setting conditions, add a new action by clicking on ‘Add component’ and select ‘Assign issue’.
- You can choose to assign it to a specific user, lead, or use advanced options like round-robin or load-balanced assignments.
Step 6: Round-Robin Assignment
- For a round-robin setup, choose ‘Assign to a user from a list’ and select users in the round-robin pool.
- Jira will cycle through this list in order, evenly distributing issues.

Step 7: Load-Balanced Assignment
- To assign based on the user’s current issue load, use ‘Assign to the least busy user’ which considers each user’s open issues.
Step 8: Save and Name Your Rule
- After configuring the rule, click ‘Save’.
- Name your rule to reflect its function, like ‘Auto-Assign Bugs to QA Team’, and then turn the rule on.
Step 9: Test Your Rule
- Test the automation by creating a new issue that meets the criteria you set. Check if it gets assigned correctly.
- Adjust the rule as necessary based on the results.
Step 10: Monitor and Optimize
- Use the audit log in the automation section to monitor the rule’s performance.
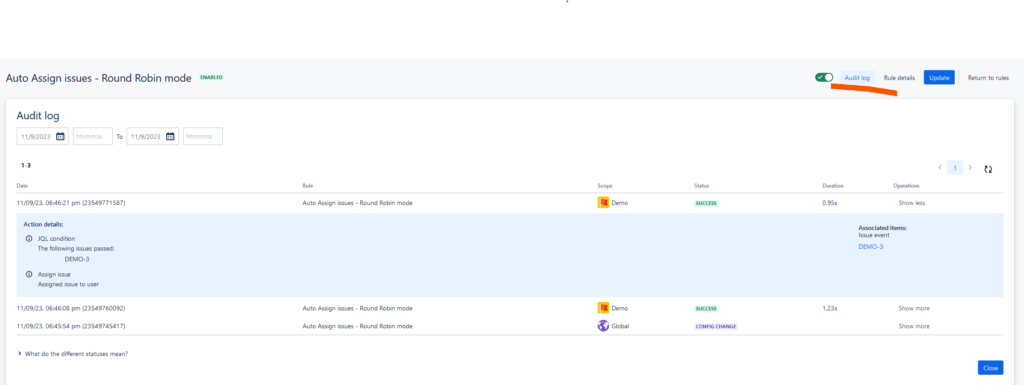
- Make adjustments based on team feedback and changing project needs.
Due Date Reminders:
Timely completion of tasks is the backbone of successful project management, and due date reminders play a crucial role in ensuring your team stays on track. Automating these reminders in Jira can significantly reduce the chances of deadlines slipping by unnoticed.
Step 1: Identify the Trigger
- Choose ‘Schedule’ as your trigger when creating a new rule in Jira’s automation settings. This allows you to run this rule at a regular interval, say every morning, to check for due dates.
Step 2: Define the JQL Condition
- Use JQL to identify issues that are approaching their due date. For instance, the JQL could be
due <= 7d AND status != Done, which finds issues due within the next seven days and are not completed.

Step 3: Determine the Action
- Add an action such as ‘Send Email’ or ‘Comment on Issue’ to notify the assignee or team. Customize the message to include relevant details like the due date and any required actions.
Step 4: Fine-Tune With Smart Values
- Utilize Jira’s smart values to personalize notifications. For example, include the assignee’s name, the issue key, and a direct link to the issue.
Step 5: Save and Enable
- Once your rule is configured, save it. Give it a clear name like “7-Day Due Date Reminder” and enable it.
Benefits of Automated Due Date Reminders:
- Consistency: Automation ensures that no due date goes unnoticed, providing consistent reminders without fail.
- Proactivity: Reminders before the due date encourage proactive actions and can prevent last-minute rushes.
- Prioritization: They help team members to prioritize their work, especially as deadlines approach.
- Stress Reduction: Knowing that Jira will remind them of upcoming due dates can reduce anxiety for team members, as they don’t need to keep track of everything themselves.
Best Practices:
- Set Multiple Reminders: Have different reminders for various time frames (e.g., two weeks, one week, three days) to give team members enough time to react.
- Adjust Frequency Based on Project Phase: As a project nears its deadline, increase the frequency of reminders to maintain momentum.
- Personalize the Message: Make sure the message in the reminder is clear and provides actionable insights.
- Use Escalation Wisely: If an issue remains unresolved past its due date, escalate the reminder to a higher authority to ensure it’s addressed.
Sync Status Across Linked Issues:
When managing complex projects, the interlinking of tasks can create a web of dependencies that are challenging to navigate. Issues often move at different speeds, and keeping their statuses in sync manually is not only time-consuming but also prone to error.
Automating the synchronization of issue statuses across linked tasks in Jira can be a game-changer, ensuring that the entire team is aware of each item’s progress and how it affects related work.
Implementing Status Synchronization:
Step 1: Choose a Trigger
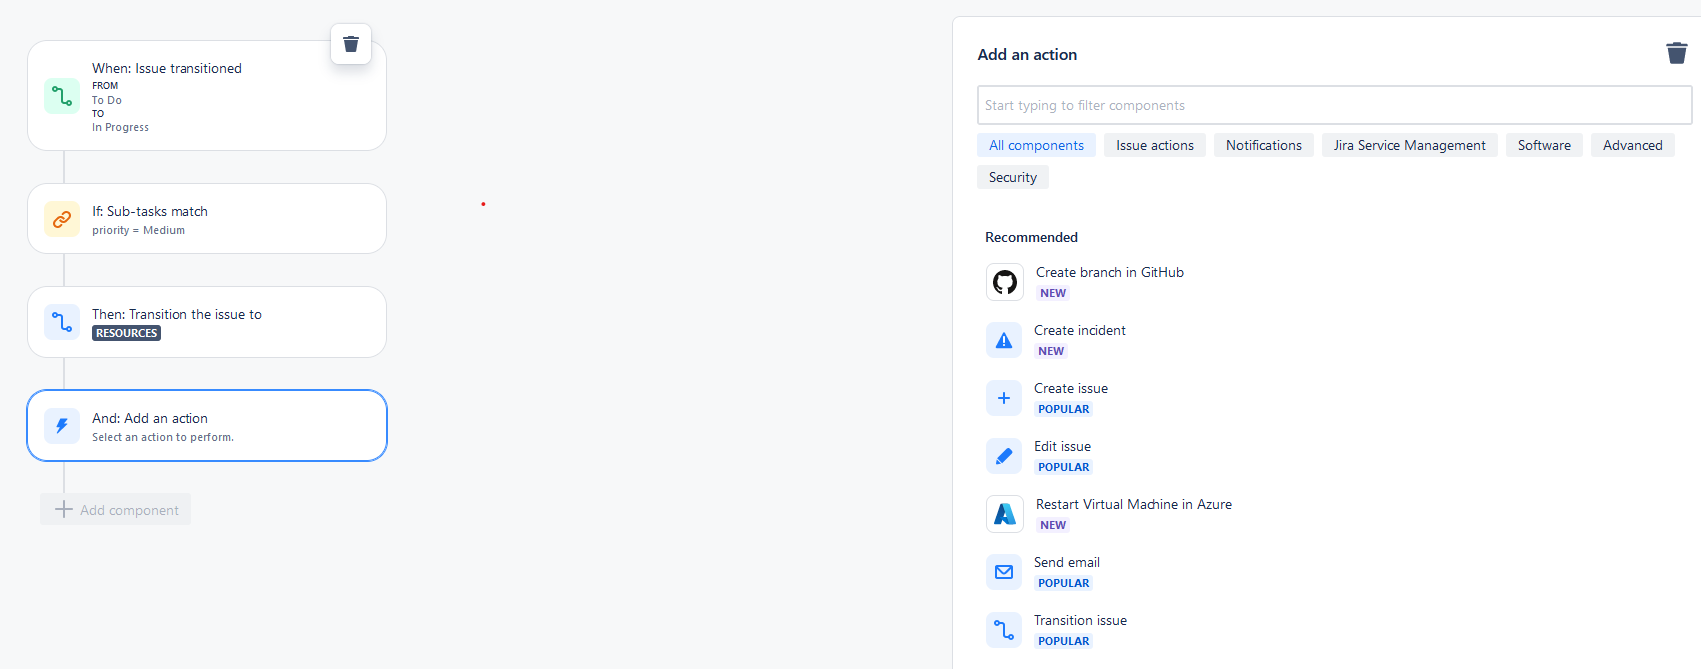
- Initiate your automation by selecting ‘Issue transitioned’ as the trigger. This ensures that the rule runs whenever an issue changes its status.
Step 2: Identify Linked Issues
- Use the ‘Related issues condition’ to specify which linked issues should have their status updated. This can be based on the type of link, such as ‘is blocked by’ or ‘blocks’.
Step 3: Define the Status Transition
- Add a new action, ‘Transition issue’, and choose the status to which the linked issues should be moved. This could mirror the triggering issue’s new status or be a specific status that reflects the project’s workflow.
Step 4: Add Exclusions if Necessary
- You may want to exclude certain issues from being transitioned automatically (e.g., those in a ‘Done’ status). Use JQL in the conditions to define these exceptions.
Step 5: Finalize and Test
- Save the rule with a descriptive name like “Sync Linked Issue Statuses” and enable it. Test it with a set of linked issues to ensure it works as expected.
Advantages of Status Synchronization:
- Increased Visibility: All team members can see the progress of linked issues in real time, reducing confusion and the need for status update meetings.
- Improved Coordination: Teams can coordinate their efforts more effectively when they understand how the completion of one task affects another.
- Time Efficiency: Automating this process saves significant time that would otherwise be spent manually updating each linked issue.
- Error Reduction: Manual status updates are prone to being overlooked or done incorrectly; automation eliminates this risk.
Prioritize Urgent Issues
Certain tasks demand immediate attention. However, these urgent issues can get lost in the shuffle of day-to-day operations.
By setting up automation rules in Jira to prioritize urgent issues, you ensure that they rise to the top of your team’s agenda, allowing for quick identification and action.
Creating Urgency-Based Automation Rules:
Step 1: Set the Trigger
- Start by selecting ‘Issue created’ or ‘Issue updated’ as your automation trigger. This will activate the rule whenever an issue is added or modified, which is crucial for catching any urgent items.
Step 2: Define Urgency Criteria
- Determine what constitutes an ‘urgent’ issue for your team. It could be certain keywords in the title or description (like ‘urgent’, ‘ASAP’, ‘immediate’, etc.), a specific label, or a priority field set to ‘Highest’.
Step 3: Add a Condition for Urgency
- Insert a new condition to check for the urgency criteria you’ve defined. Use JQL for precision, e.g.,
summary ~ "urgent" OR labels in (urgent, asap).
Step 4: Automate the Prioritization Action
- Add an action to modify the issue’s priority to ‘Highest’ and place it in an ‘Urgent’ swimlane on your board or at the top of the backlog.
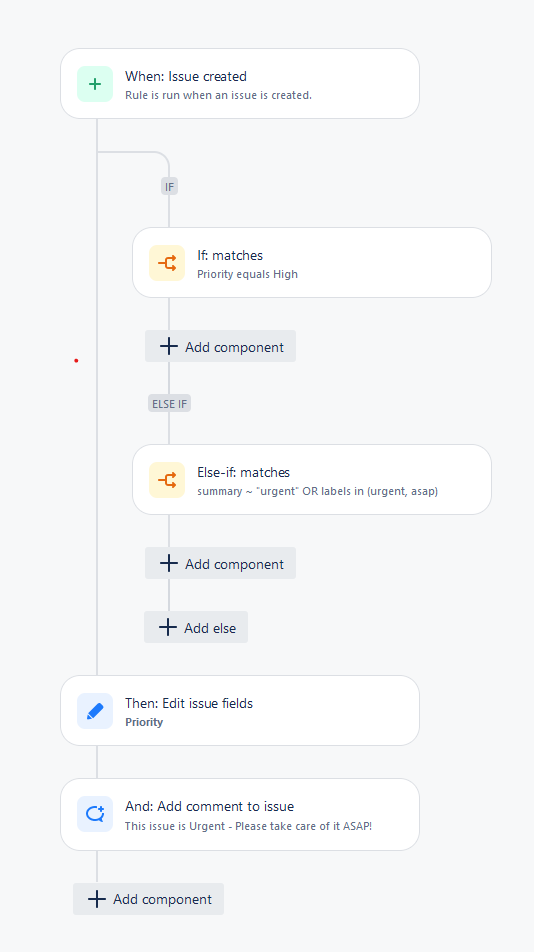
Step 5: Notify the Team
- Include an action to send a notification to the relevant team or individual. This can be through a comment, which mentions the user(s), or an email alert for high visibility.
Step 6: Save, Name, and Test the Rule
- After setting up the rule, save and name it something indicative of its function, like “Urgency Filter for Issues”. Activate the rule and conduct tests to ensure it’s working as intended.
Clean Up Your Backlog – Automation Rule:
A cluttered backlog can obscure important tasks and slow down productivity.
Regularly cleaning up your backlog ensures that your team can focus on current and upcoming priorities without being hindered by outdated or irrelevant issues. Jira’s automation rules offer a straightforward solution for maintaining a streamlined backlog.
Setting Up Backlog Cleanup Rules:
Step 1: Define the Trigger
- Select ‘Scheduled’ as the trigger for your rule to run the cleanup at a set interval, such as weekly or monthly.
Step 2: Set Conditions for Cleanup
- Use JQL to find issues that need attention, such as those that have been inactive for a certain period. For example,
updatedDate <= -30d AND statusCategory != Donewill find issues not updated in the last 30 days and not completed.
Step 3: Choose Cleanup Actions
- Decide on the actions to take for these stale issues. Options include transitioning them to a ‘Closed’ status, adding a comment to prompt the assignee for an update, or moving them to a ‘Stale’ or ‘Backlog Cleanup’ status for further review.
Step 4: Notify Stakeholders
- Add an action to notify issue assignees or reporters that their issue has been flagged as stale and will be closed or requires attention.
Step 5: Test Your Automation
- After setting up the rule, name it appropriately (like “Monthly Backlog Cleanup”) and turn it on. Perform a dry run with a small set of test issues to ensure it behaves as expected.
Advantages of Automated Backlog Cleanups:
- Enhanced Focus: A clean backlog means the team can concentrate on what’s truly important, without the distraction of irrelevant tasks.
- Resource Optimization: It helps to ensure that resources are allocated to active and impactful issues rather than being wasted on those that are no longer relevant.
- Project Health: Regular cleanup maintains the health of the project by preventing backlog bloat and potential overwhelm.
The steps outlined in this guide are more than just instructions; they are a pathway to transforming your project management into a streamlined, more productive operation. As you implement these automation rules, you’re setting up a system that works tirelessly in the background, ensuring that no detail is overlooked and every task is given the attention it needs.
Remember, the ultimate goal of using Jira’s automation is to reduce the cognitive load on your team members, freeing them up from the repetitive, manual tasks that can so often bog down project progress. By entrusting these tasks to Jira’s capable automation system, you’re not only optimizing your workflows but also enhancing team morale and fostering a culture of productivity.
What are some top automation rules you are using in Jira?
hiI like your writing so much share we be in contact more approximately your article on AOL I need a specialist in this area to resolve my problem Maybe that is you Looking ahead to see you